Build Embedded Accounting in 20 Minutes
By the end of this guide you will have extended your chart of accounts, invoiced a customer for real money, recorded the payment, and read the resulting double-entry records back from the ledger — entirely over the API.
That last part is the point. Most accounting integrations stop at "the invoice was created." This walkthrough keeps going until you can see what the ledger did about it, because that's the part your customers' accountants will trust you on.
What you need:
- A sandbox company — sign up and create your company in that flow
- App Connect credentials (
client_id/client_secret) from Company settings in the workspace curlor any HTTP client- 20 minutes
Exchange your App Connect credentials first by following steps 0 and 1 of Post Your First Journal in 5 Minutes. Then export the returned token, API base, and the same registered partner domain:
export ACCESS_TOKEN="<from the credential exchange>"
export BASE="https://api-sandbox.paprel.com"
export PARTNER_DOMAIN="app.yourproduct.com"
export AUTH="authorization: Bearer $ACCESS_TOKEN"
export CT="content-type: application/json"
export PARTNER="x-partner-domain: $PARTNER_DOMAIN"
The calls below use an App Connect token. App Connect writes do not require x-data-signature; operator/API-credential writes use the separate signing path documented in Authentication and tokens.
All paths are relative to the sandbox API base URL. The exact request and response schemas for every endpoint here are in the API reference.
Step 1 — Look at (and extend) the chart of accounts
You don't start from zero: the company already has a working chart of accounts. Read it first.
curl $BASE/v1/accounting/accounts -H "$AUTH" -H "$PARTNER"
Endpoint reference: GET /v1/accounting/accounts →
Now add an account of your own — say, a dedicated revenue account for design services, nested under the income tree:
curl -X POST $BASE/v1/accounting/accounts \
  -H "$AUTH" -H "$PARTNER" -H "$CT" \
  -d '{
    "account": "Design Services Revenue",
    "kind": "…",
    "account_subtype": "…",
    "currency": "USD",
    "is_sub_account": true,
    "parent_id": "…"
  }'
Endpoint reference: POST /v1/accounting/accounts →
Use a parent_id from the GET response in the previous call, and a kind/account_subtype matching the income branch you're nesting under.
Behind the scenes: the chart of accounts is the spine of every report you'll see in step 7. When the invoice in step 4 posts revenue, it posts to an account in this tree — which is why the P&L can group, subtotal, and compare without any reporting configuration on your side. Hierarchies (parent/child accounts) are how detailed books stay readable.
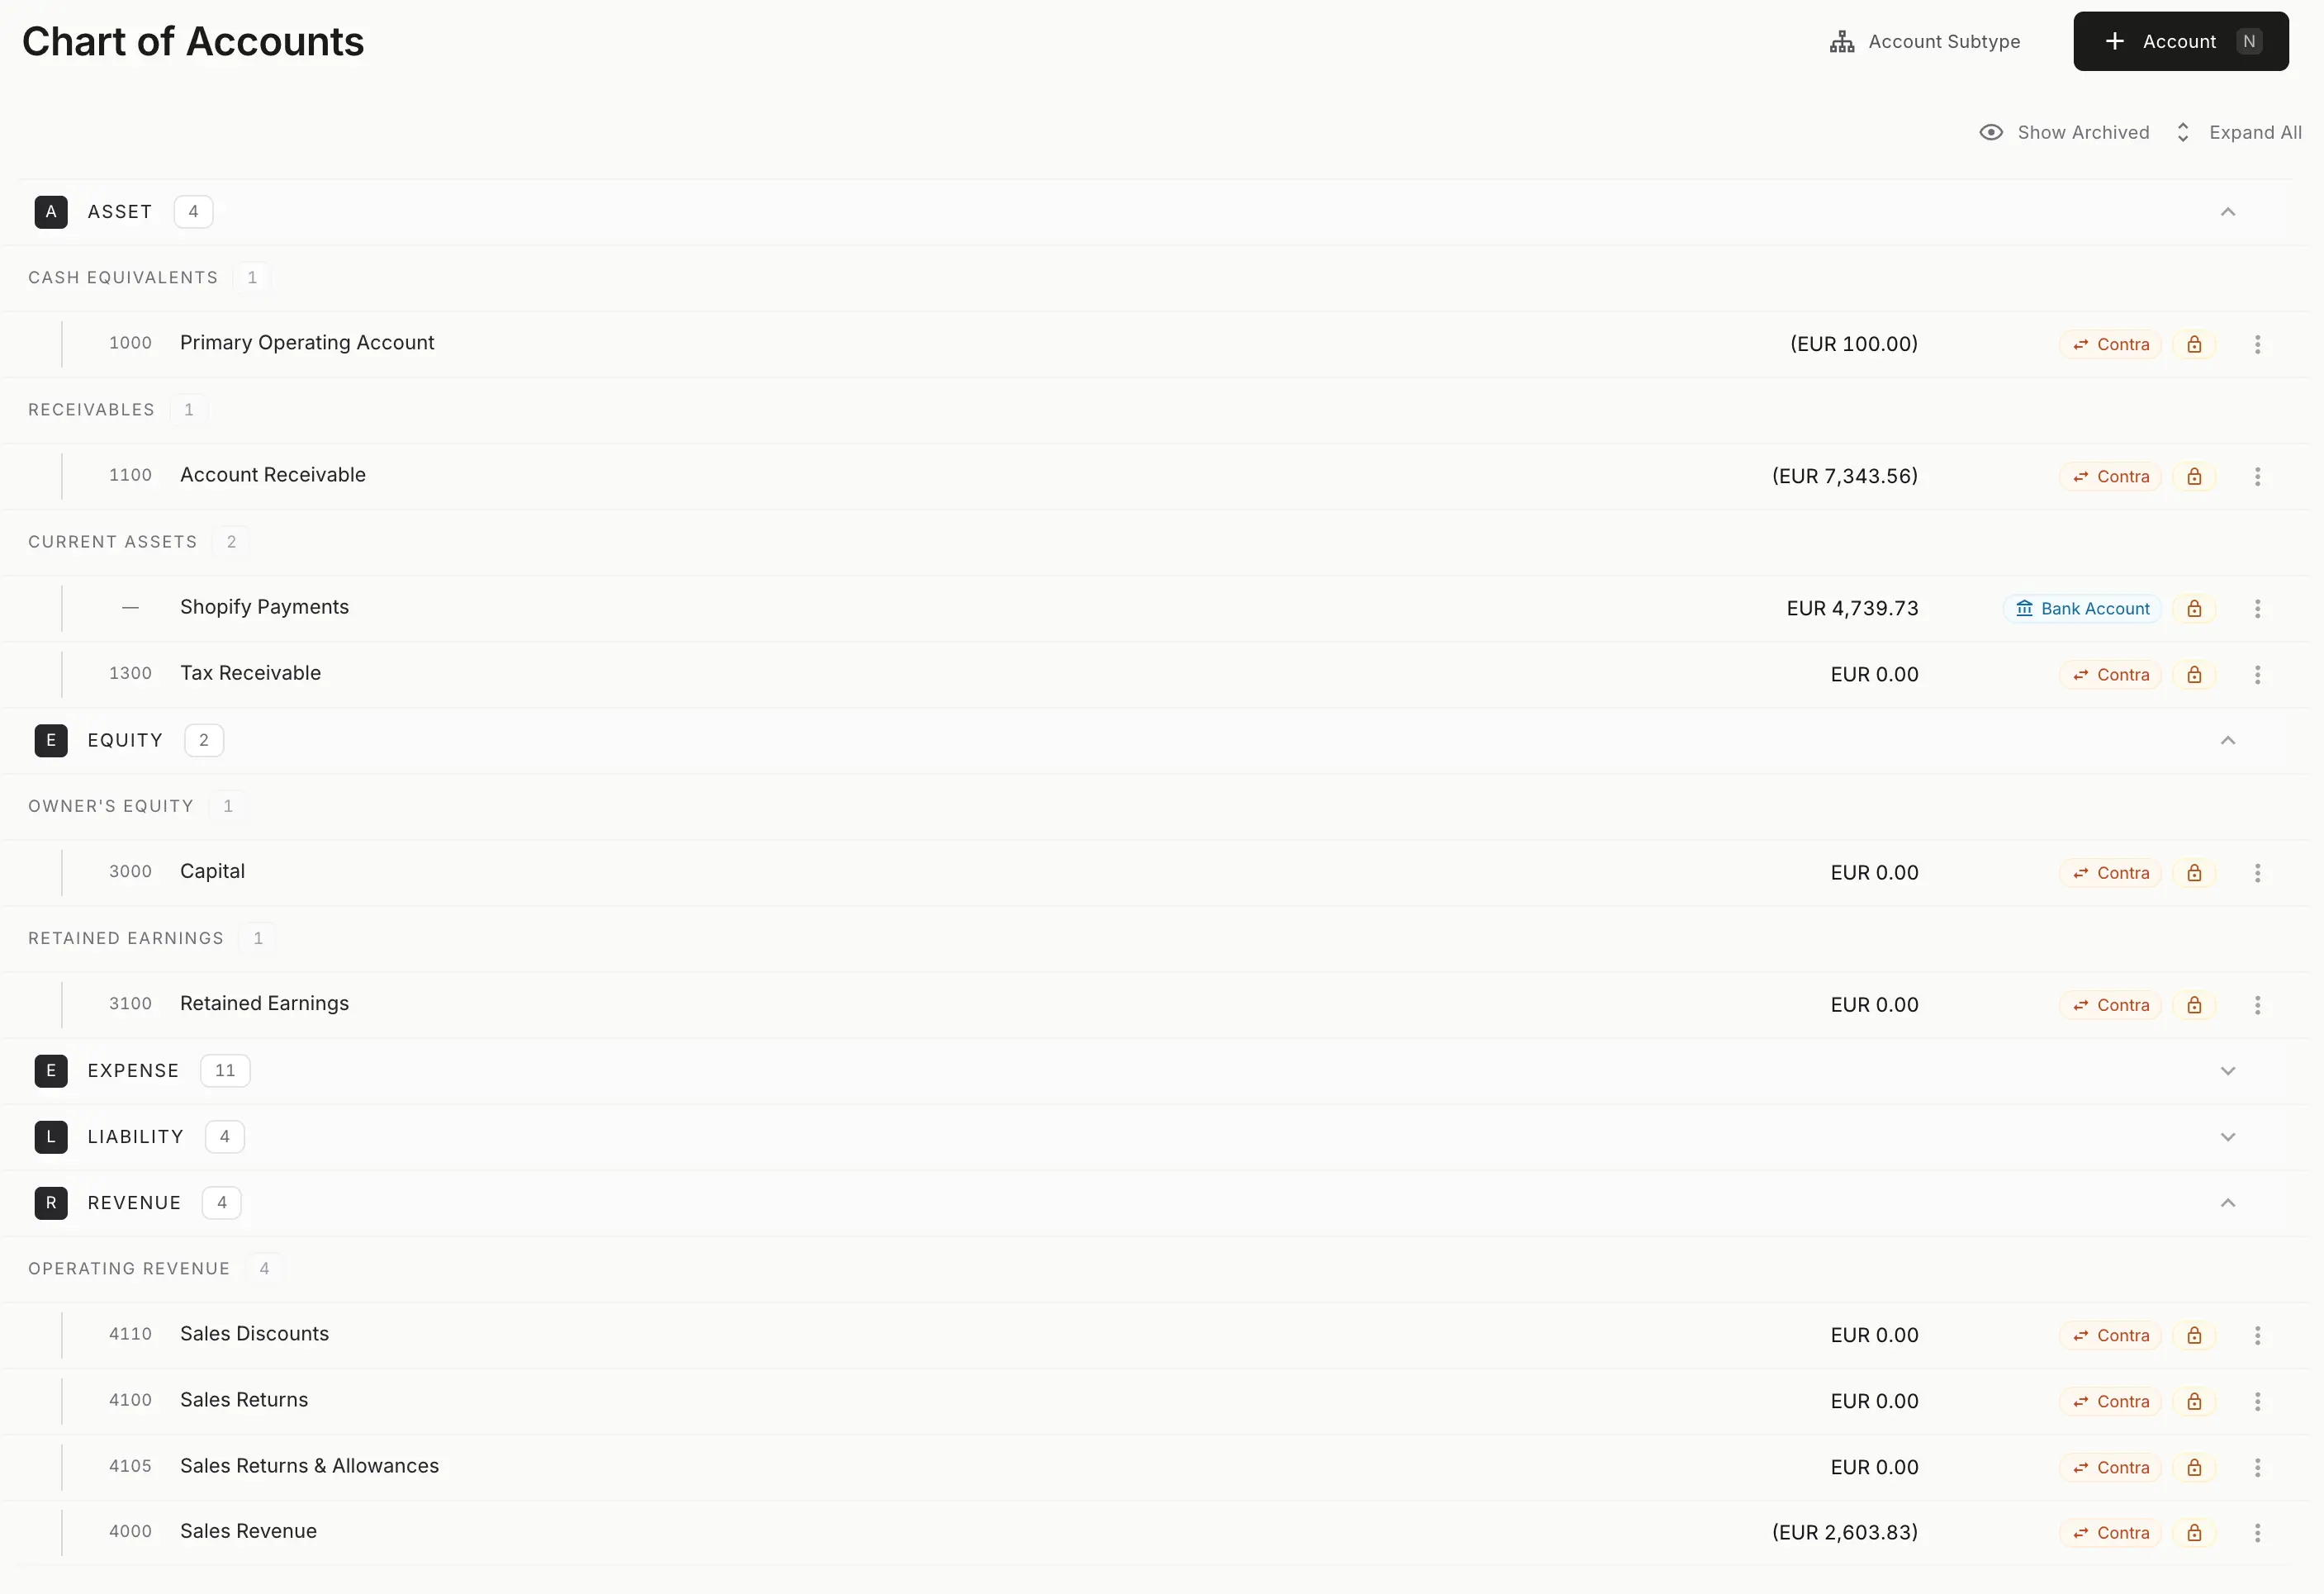
The seeded chart, rendered in the workspace: coded accounts grouped by type — assets, equity, expenses, liabilities, revenue — with the hierarchy your step-1 account slots into.
Step 2 — Create a customer
curl -X POST $BASE/v1/clients \
  -H "$AUTH" -H "$PARTNER" -H "$CT" \
  -d '{
    "company_name": "Brightline GmbH",
    "company_email": "billing@brightline.example",
    "contact_first_name": "Jonas",
    "contact_last_name": "Weber",
    "currency": "USD",
    "payment_term": "…"
  }'
Endpoint reference: POST /v1/clients →
Keep the returned people_id — the invoice in step 4 references it.
Behind the scenes: a customer record is more than a name on a PDF. It anchors the receivables sub-ledger: every invoice, credit note, and payment for this customer links back to it, which is how "what does Brightline owe us?" becomes a single indexed read instead of a report you assemble by hand.
Step 3 — Create a product
curl -X POST $BASE/v1/items \
  -H "$AUTH" -H "$PARTNER" -H "$CT" \
  -d '{
    "item_name": "Brand identity package",
    "item_type": "service",
    "sku": "DSN-001",
    "sales_price": "4800.00",
    "sales_currency": "USD",
    "sales_account_id": "…",
    "sales_description": "Logo system, typography, and brand guidelines"
  }'
Endpoint reference: POST /v1/items →
Set sales_account_id to the "Design Services Revenue" account you created in step 1 — this is the link that makes revenue land in the right place automatically.
Behind the scenes: the item carries its accounting treatment with it. Anyone (or any agent) who invoices this item never has to know which ledger account revenue belongs in — the mapping was decided once, here, by whoever understood the books.
Step 4 — Create an invoice
Now the pieces compose:
curl -X POST $BASE/v1/invoices \
  -H "$AUTH" -H "$PARTNER" -H "$CT" \
  -d '{
    "people_id": "<people_id from step 2>",
    "currency": "USD",
    "document_issue_date": "2026-06-12",
    "document_due_date": "2026-07-12",
    "items": [
      {
        "item_id": "<item id from step 3>",
        "item_name": "Brand identity package",
        "item_quantity": "1",
        "item_cost": "4800.00"
      }
    ]
  }'
Endpoint reference: POST /v1/invoices →
The response includes the invoice's anchor_id — the stable identifier that survives edits. Use it for everything that follows. (Invoices are versioned internally; every edit creates a new version while the anchor stays constant. That's what makes the audit trail in step 7 possible.)
Behind the scenes — this is where double-entry starts working for you. Posting this invoice generates a balanced journal:
| Account | Debit | Credit |
|---|---|---|
| Accounts Receivable | 4,800.00 | |
| Design Services Revenue | 4,800.00 |
You didn't write that journal. The invoice did — through the account mapping from step 3. Debits equal credits or the ledger rejects the posting; there is no code path that lets an unbalanced entry through.
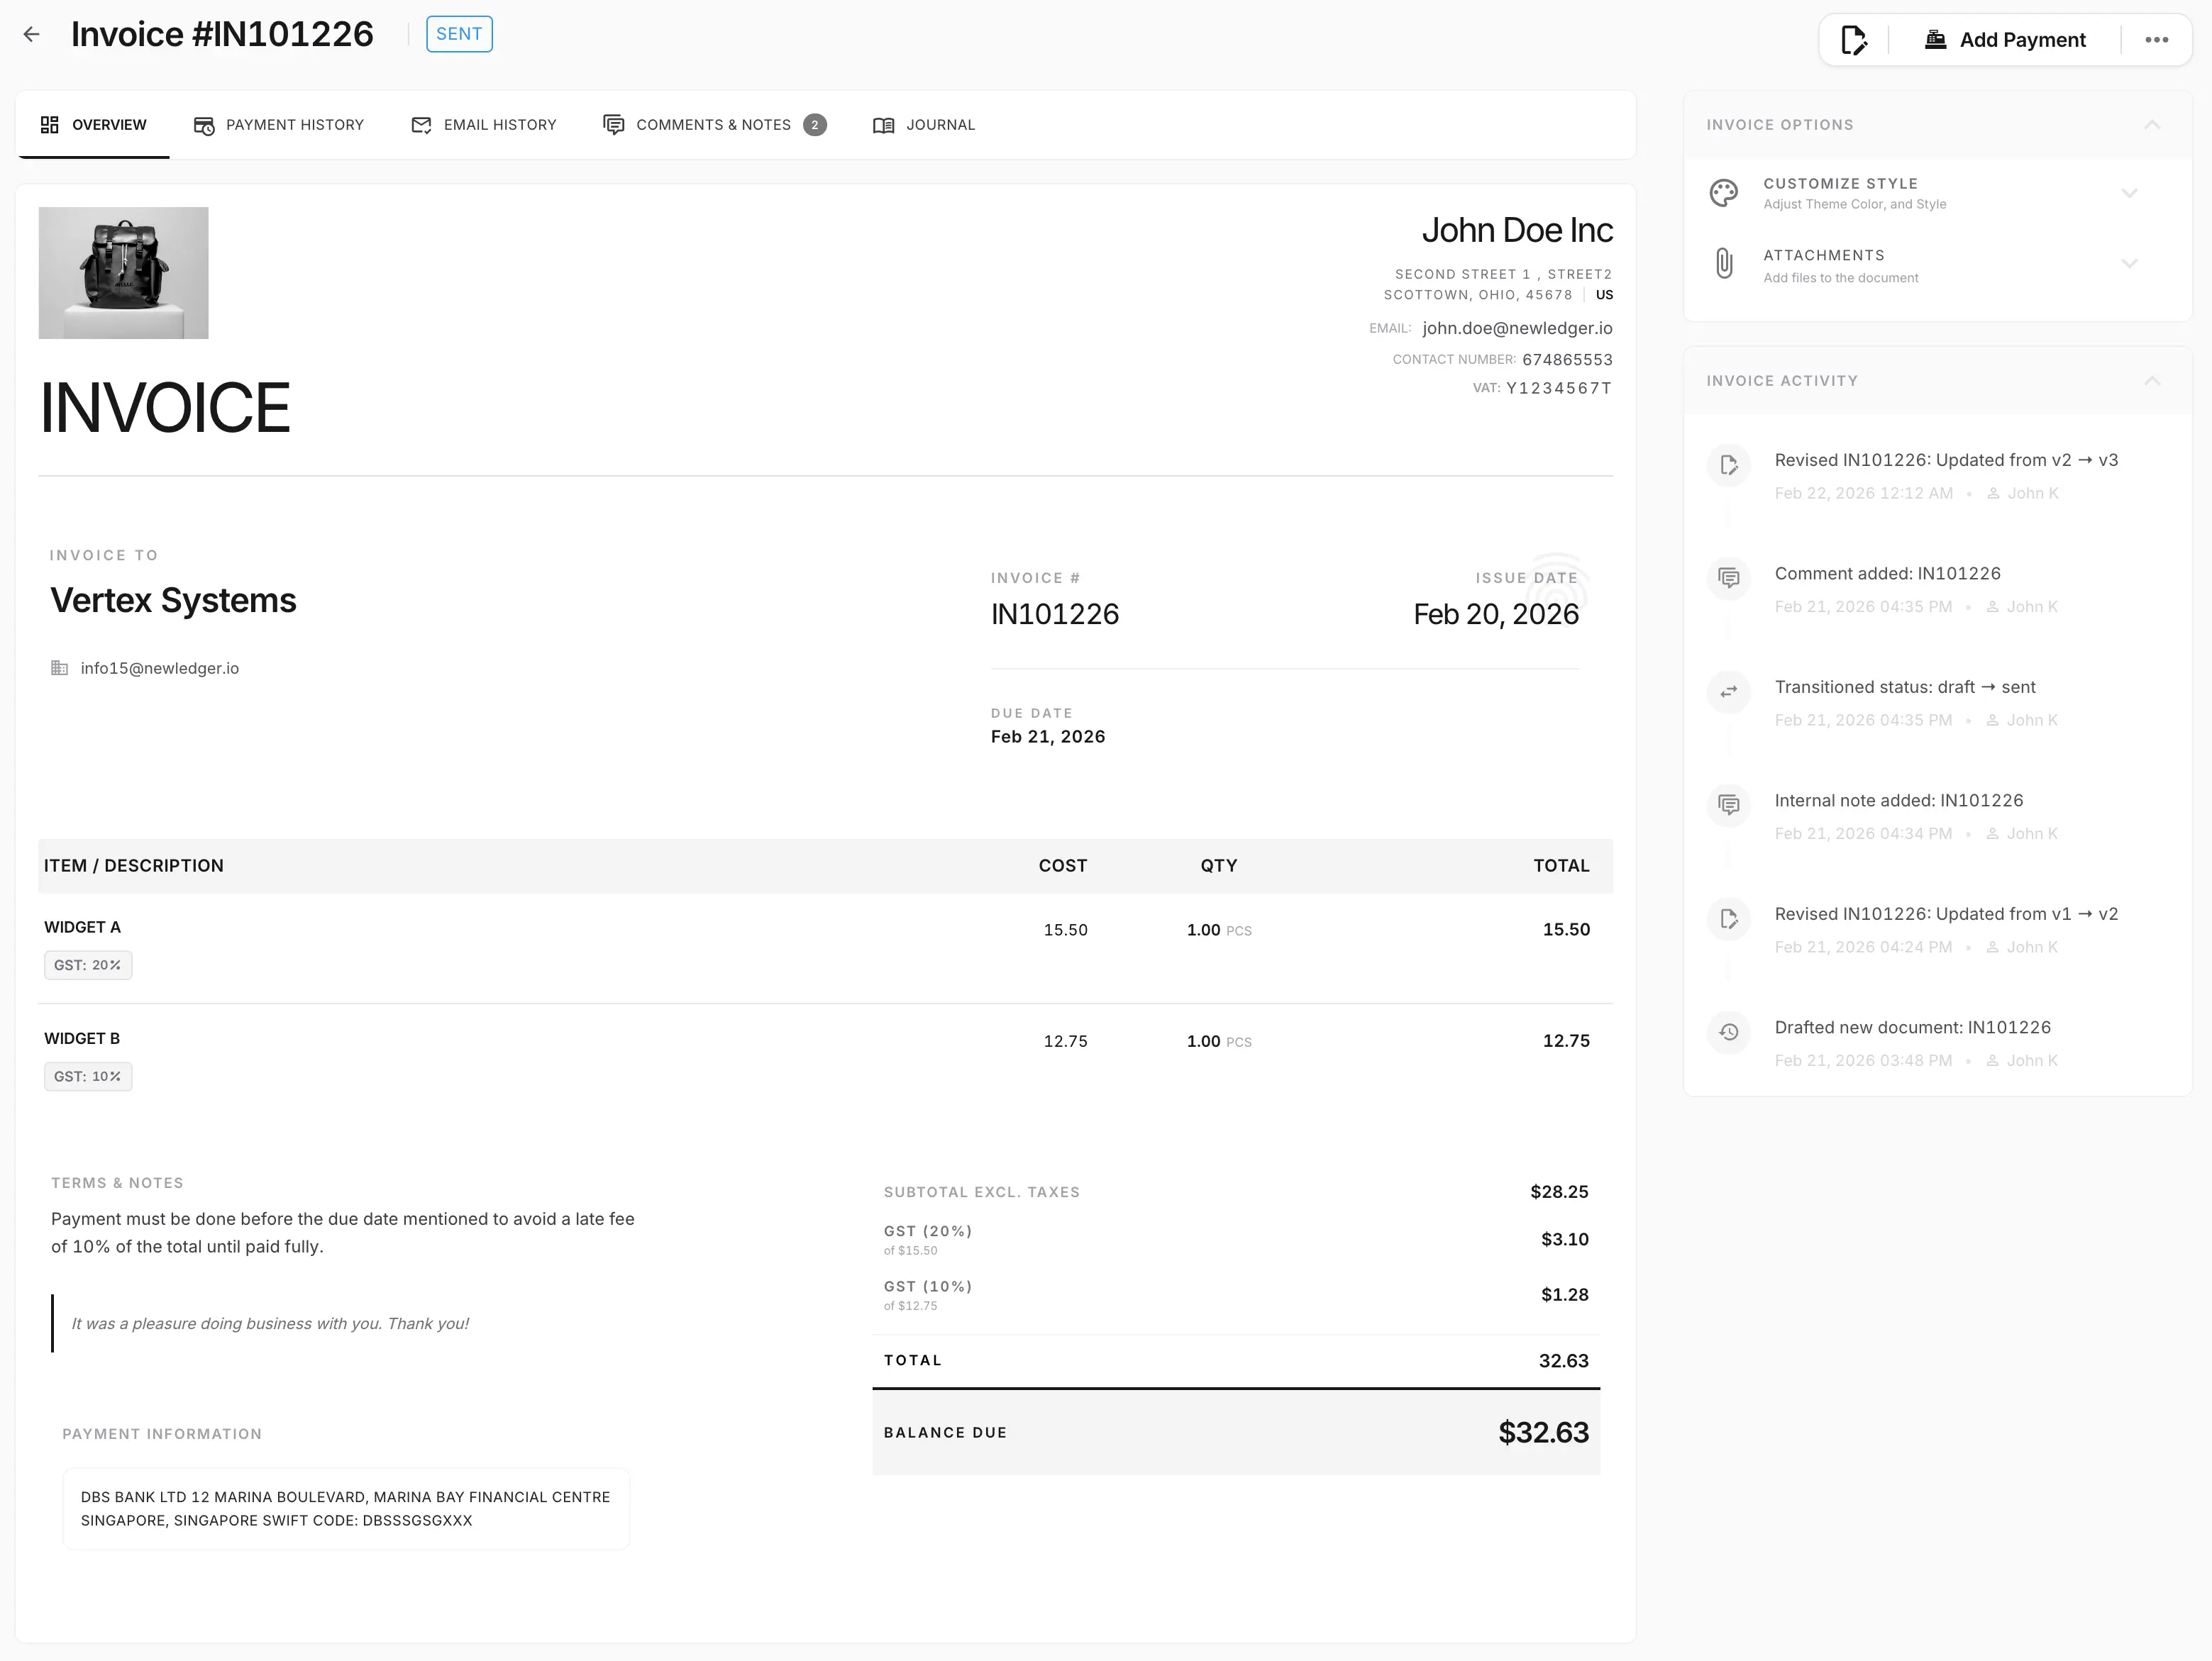
The invoice in the workspace. Note the activity panel on the right: drafted, revised v1 → v2 → v3, status transitioned draft → sent — every step you take over the API lands in this same history.
Step 5 — Send the invoice
curl -X POST $BASE/v1/invoices/<anchor_id>/mail/send \
  -H "$AUTH" -H "$PARTNER" -H "$CT"
Behind the scenes: delivery is logged on the document's activity history alongside every other action — created, edited, sent, paid — so the full lifecycle is reconstructible later. If your platform needs an approval gate before sending (draft → reviewed → approved), invoice statuses are configurable via the status settings endpoints, and status changes land in the same audit history.
Step 6 — Receive the payment
Brightline pays. Record it against the invoice:
curl -X POST $BASE/v1/invoices/<id>/payment \
  -H "$AUTH" -H "$PARTNER" -H "$CT" \
  -d '{
    "payment_amount": "4800.00",
    "payment_date": "2026-06-12",
    "payment_mode": "…",
    "deposit_account": "<a bank/cash account id from step 1 GET>",
    "reference_number": "WIRE-20260612-001"
  }'
Endpoint reference: POST /v1/invoices/:id/payment →
The route parameter id is the document’s anchor_id returned when it was created.
Behind the scenes: a second journal posts, and the books update everywhere at once:
| Account | Debit | Credit |
|---|---|---|
| Cash · Operating | 4,800.00 | |
| Accounts Receivable | 4,800.00 |
Receivables for Brightline drop to zero, cash rises, revenue is untouched (it was earned in step 4 — that's accrual accounting working correctly), and the invoice flips to paid. One API call, four consistent facts.
Retried the request because of a timeout? The write path is idempotent — resubmitting returns the original result instead of double-paying the invoice.
Step 7 — Read the ledger back
Here's the proof. Ask the ledger what happened:
curl "$BASE/v1/accounting/journals" -H "$AUTH" -H "$PARTNER"
Endpoint reference: GET /v1/accounting/journals →
The response is the journal list — you'll recognize both entries from steps 4 and 6, each with balanced lines against the accounts in your chart. Every report in the workspace — P&L, balance sheet, trial balance — is generated from exactly these rows, live:
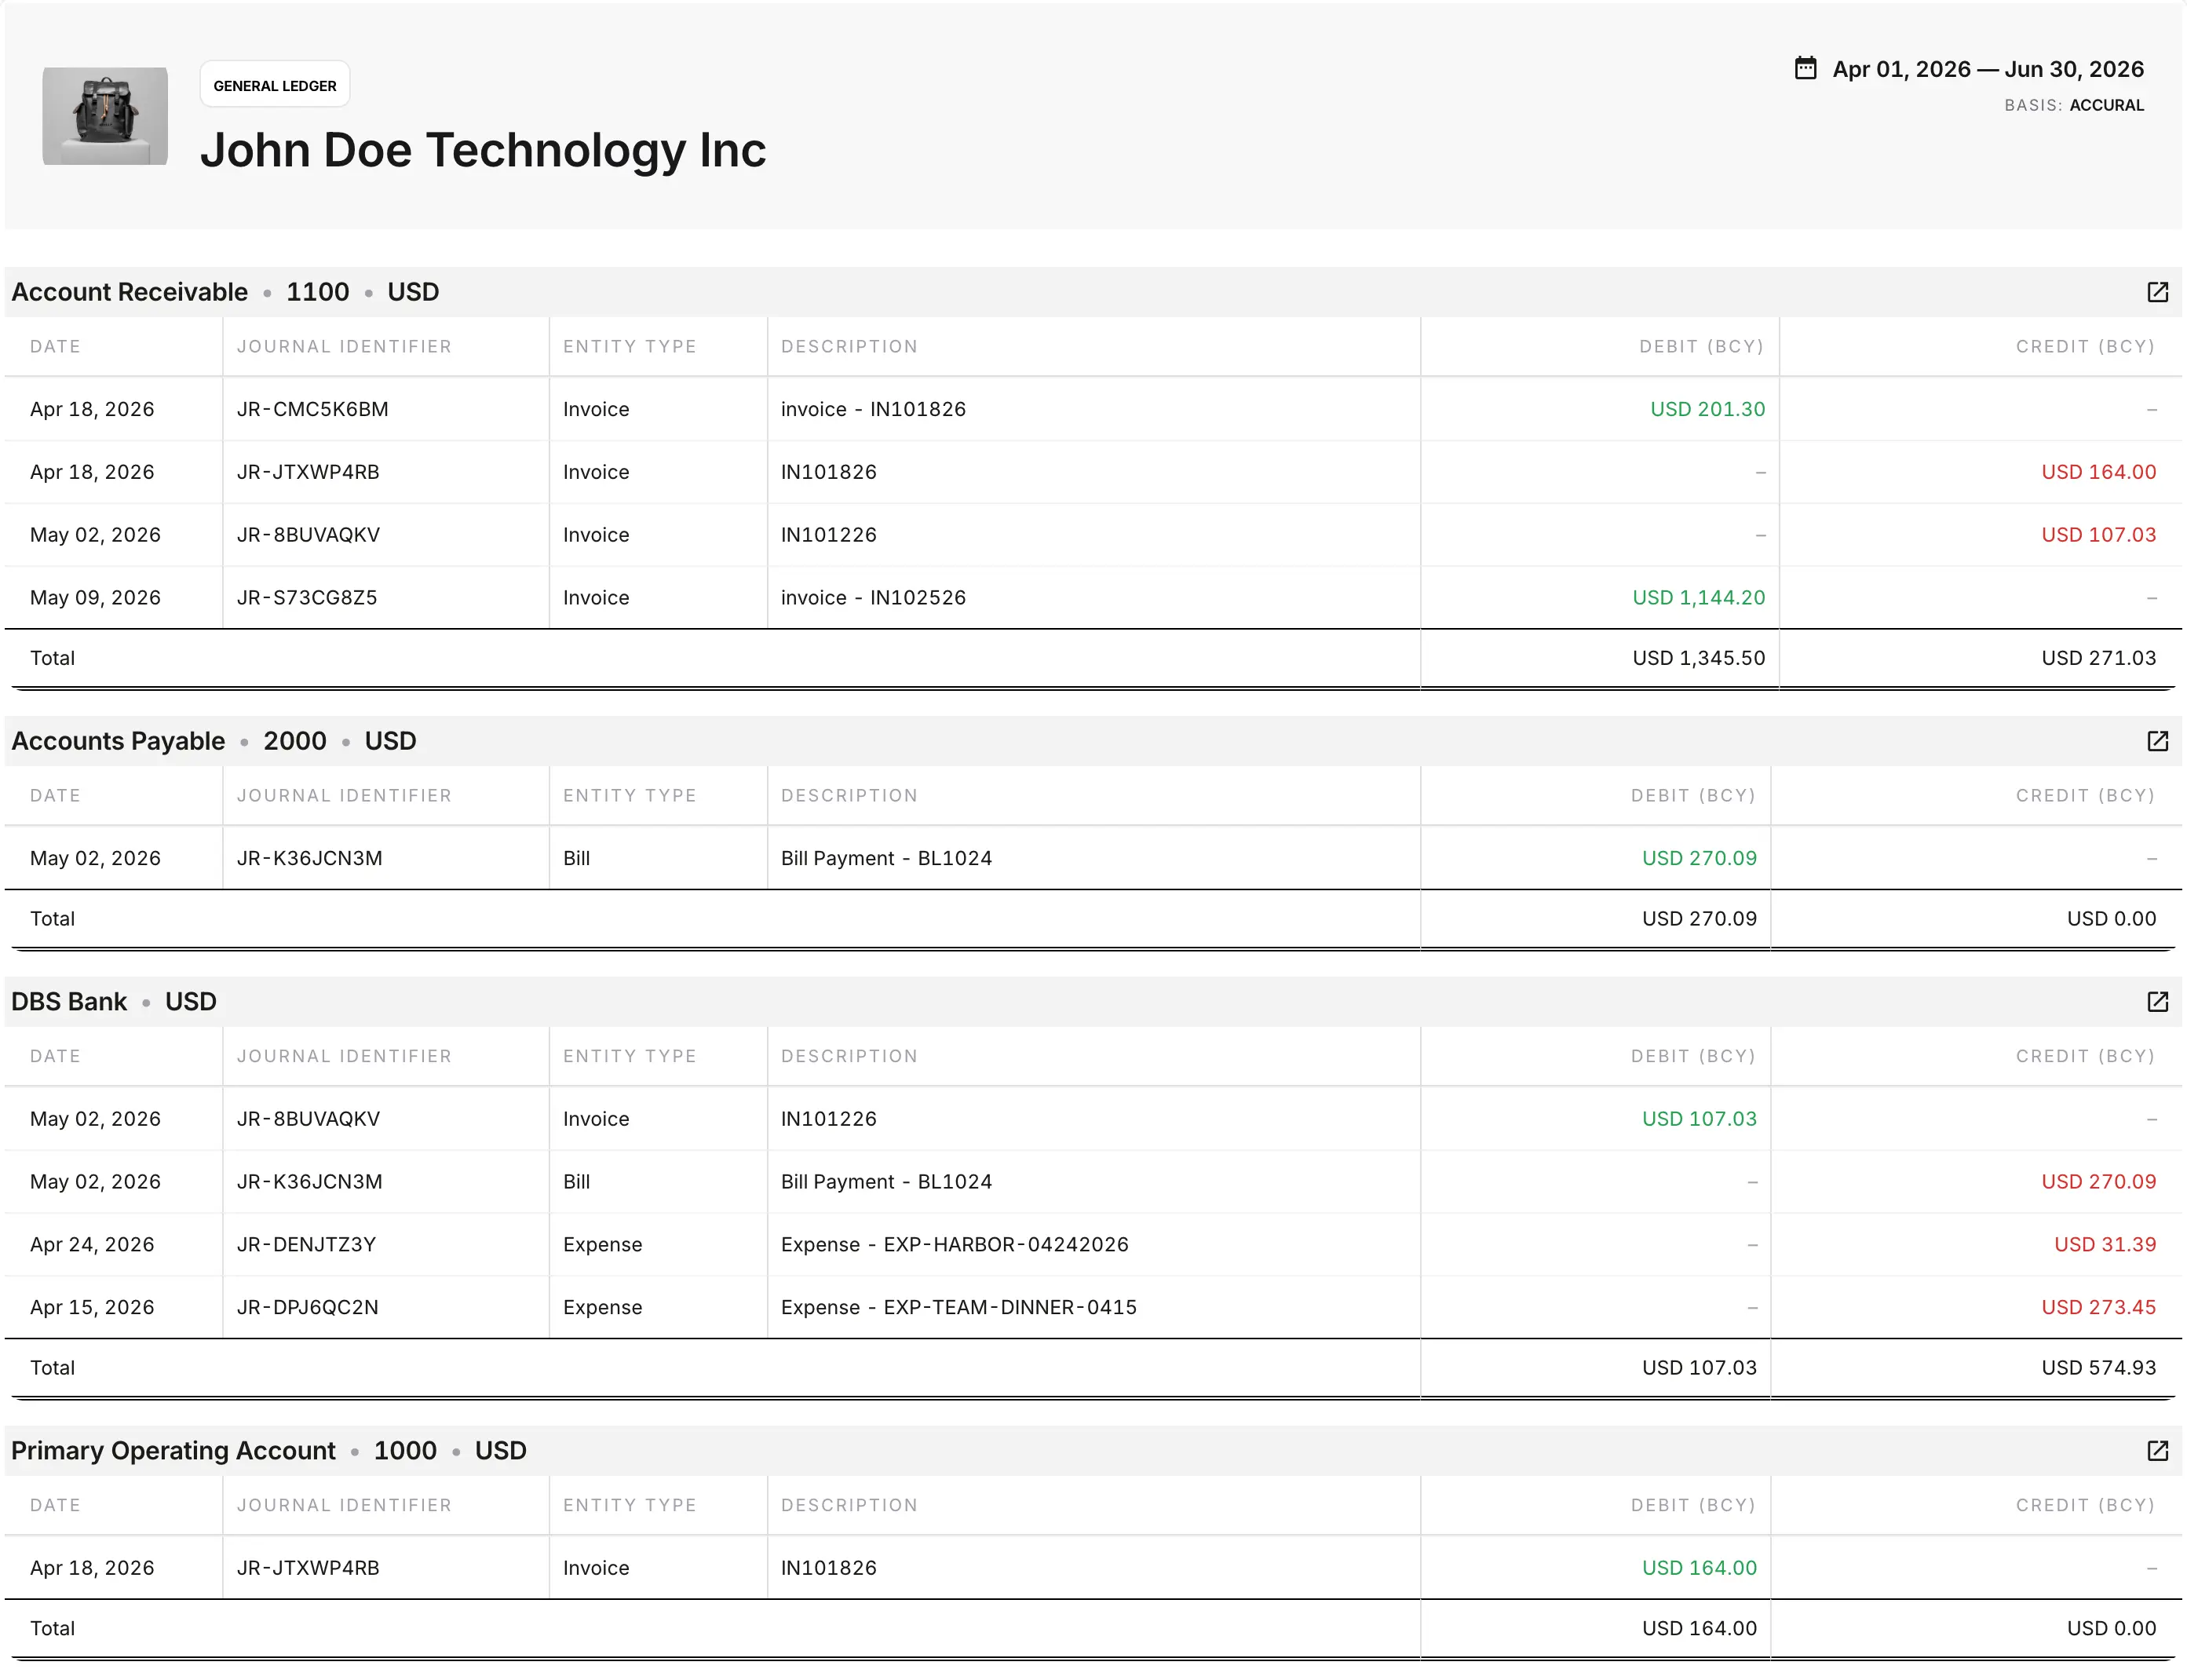
The general ledger, by account: every journal carries an identifier and links back to the document that generated it — invoices, bills, expenses.
- P&L now shows 4,800.00 in Design Services Revenue
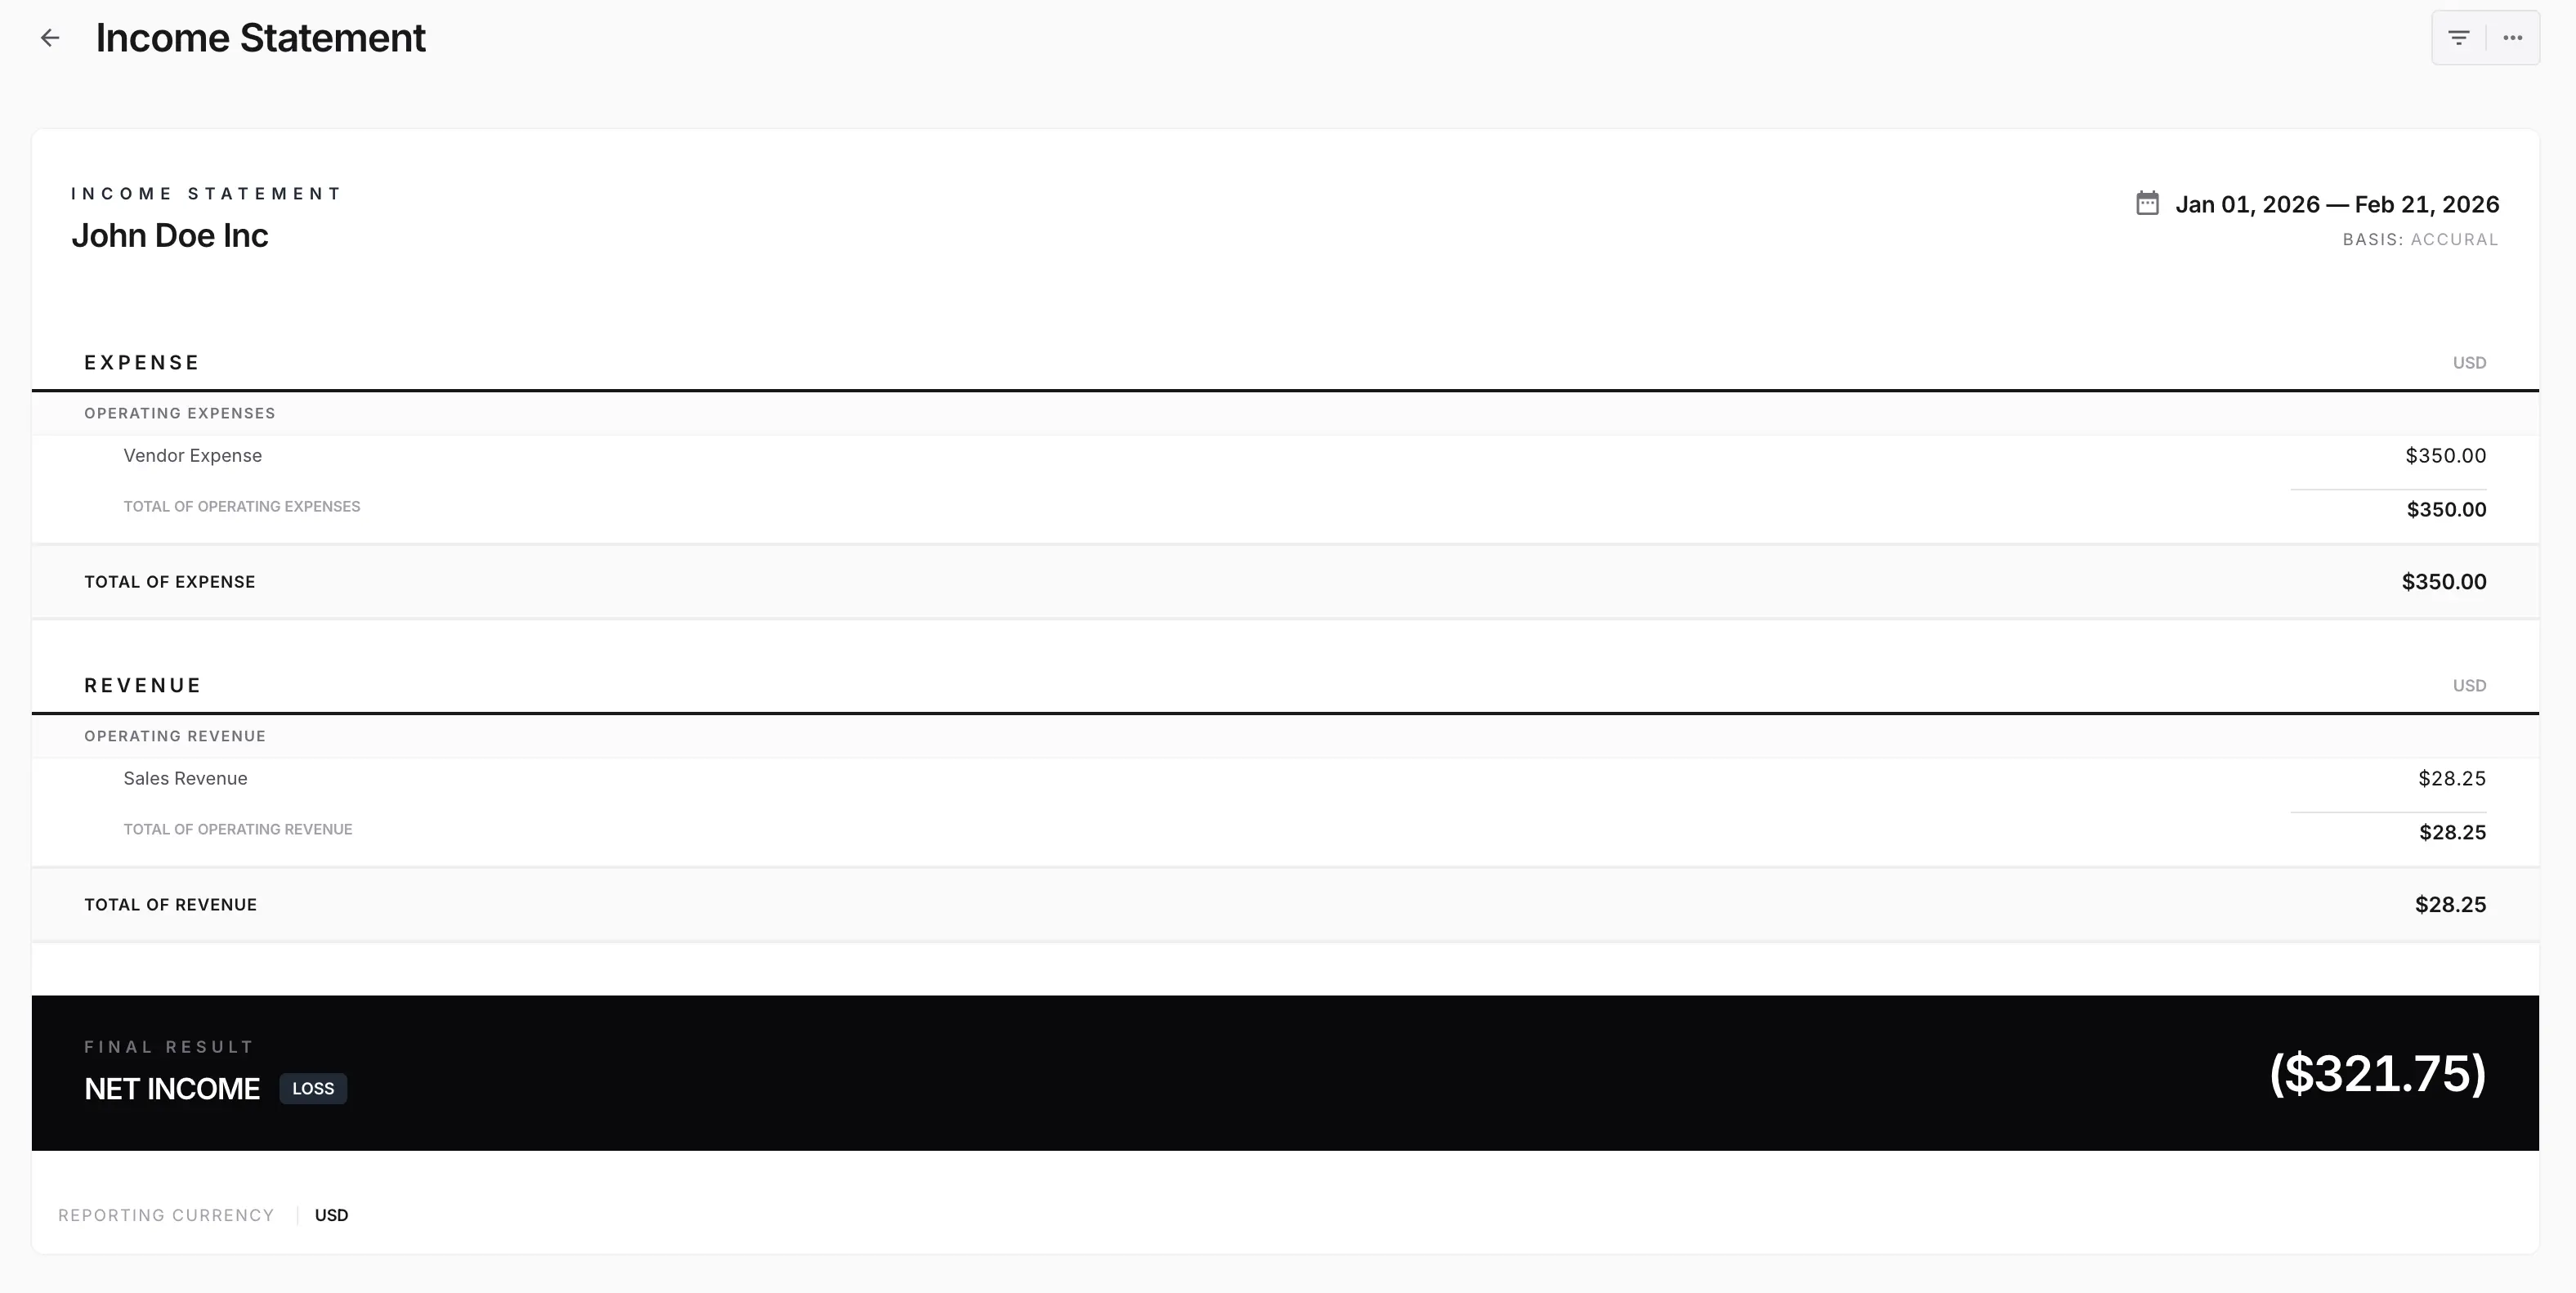
The income statement, generated live from those journal rows on an accrual basis — no sync step, no reconciliation job.
- Balance sheet shows the cash in Cash · Operating, receivables back at zero
- Trial balance ties to zero — it always does, because every posting was balanced at write time
Open the workspace UI and look at the reports to see it rendered. Then run the auditor's question against the API: who created the invoice, when was it sent, when was it paid, what did each step post? Every answer is in the activity history and journal lines you just created.
What you just built
In seven API calls you exercised the full loop most platforms take quarters to build in-house: a programmable chart of accounts, customer and item records that carry their accounting treatment, document-driven journal generation, idempotent payment recording, and reports that are derived from the ledger instead of reconciled against it.
Need to provision companies for your customers in production? See White-label platform setup.
Everything you did over REST is also exposed as MCP tools for AI agents — same primitives, scoped tokens, every agent action landing as a reviewable draft.
Where to go next:
- Embedded accounting overview — see how the ledger connects to workflows, controls, reporting, and MCP
- General ledger API — review the balanced-journal primitives and ledger guarantees you just exercised
- API reference — every endpoint, schema-accurate
- How to evaluate an embedded accounting vendor — run this same flow against anyone, including us
- Pricing — model your volume; everything in this guide was free sandbox usage
- Building a specific flow — SaaS billing, marketplace payouts, expense management? Those guides are next in this series.